
Appearance
Setting up a project
An H1 project holds everything for one building: its plan, climate zone, elements, assemblies, the compliance result, and the details that appear on the report. This page covers creating one and getting it organised.
Start from the Dashboard
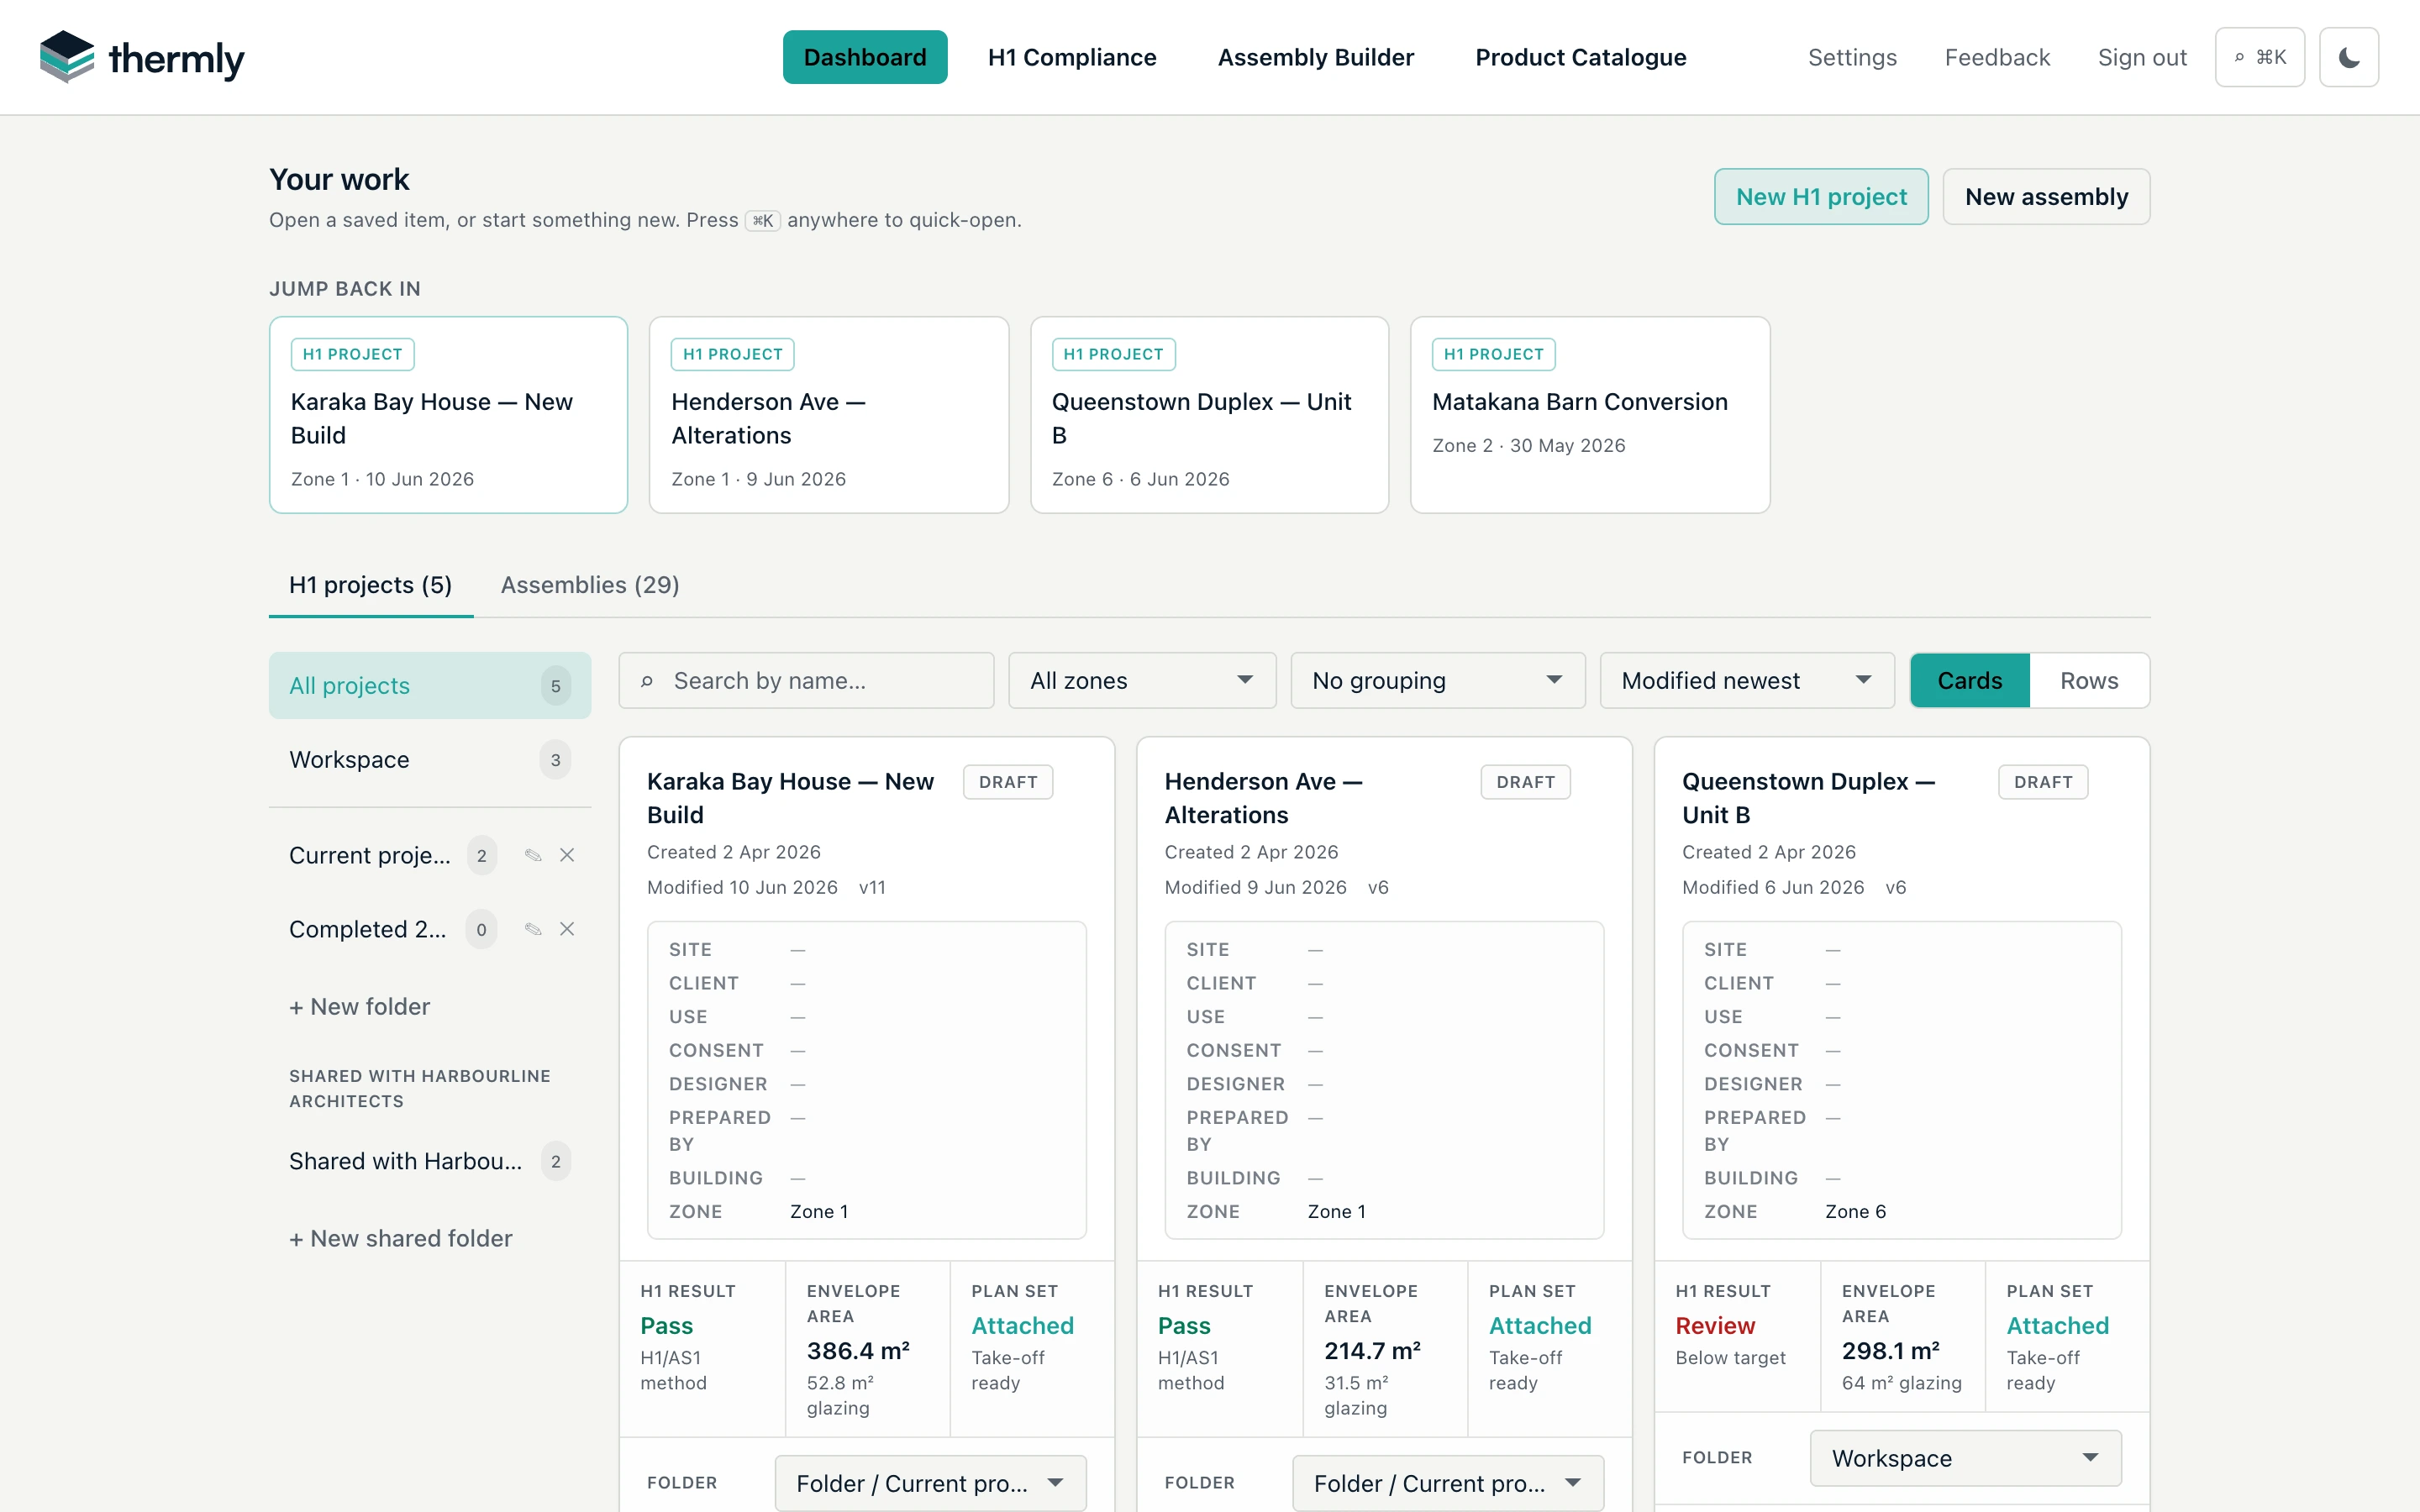
The Dashboard ("Your work") is your home base. It lists your H1 projects and Assemblies on two tabs, with recent items under Jump back in. Two buttons, on the same row as the tabs, start new work:
- New H1 project - opens a fresh project in the H1 Compliance page.
- New assembly - opens the Assembly Builder (see Assemblies and products).
You will also find the built-in sample projects here, listed ahead of your own and each marked with a teal "Sample" corner ribbon: complete demonstration jobs with a plan, take-off, assemblies and AI results (the first is "123 Sample Street, Sampletown", and there may be others). They are read-only - View sample to explore one, Copy to edit for an independent editable copy. Inside a sample the same action reads Make a copy.
Each of your own project cards carries its H1 Compliance report action and an Insulation take-off action. Its More menu holds View plan set and Make a copy; the lock sits beside the status pill, and the × in the card's corner deletes the project. In Rows view the same controls, lock and delete included, are gathered in the actions menu at the end of each row.
Press ⌘K (Ctrl+K on Windows) anywhere to quick-open a saved project by name.
Name the project
Give the project a name in the Project name field at the top of the H1 Compliance page (for example, "12 Beach Road dwelling"). The name is how you find it on the Dashboard and how it prints on the report.
A status indicator next to the name always says where your work stands: Saved, Not yet saved, Unsaved changes, or Draft with the time it was last autosaved (see Save, and track status). It also says when autosave is paused and why, for example on a locked project, and warns when another tab is editing the same draft.
Set the climate zone
Under Climate zone, either enter the site's NZ postcode (Thermly resolves the territorial authority and zone) or pick one of the six zones directly from the Climate zone dropdown. The zone is per project and selects the reference building for the heat-loss check. Zones follow H1/AS1 6th edition, Appendix C. Where a postcode's delivery range spans an official zone boundary, confirm against the territorial-authority table - the free climate zone finder does exactly that, and can carry the confirmed zone into a new project.
Fill in the project information
Project Information holds the details that print on the report cover and headers. It collects only what genuinely varies per report; blank fields render as "Not specified", so you can complete them any time before generating:
- Site address, Consent reference, and the building designer (the designer is a per-report field - it is never auto-filled from your profile, because the report author and the building's designer are different roles on a compliance document).
- Notes - a free-text box for anything worth recording (for example which spaces are excluded from the thermal envelope as unheated). Notes print on the report but never affect the calculation.
The report author's Name, Organisation and Role come from your Profile settings, so you set them once instead of retyping them per project. A collapsible Report author (override) covers the occasional report you prepare on behalf of a differently-named colleague; it pre-fills from your profile, and editing a field stores an override for that report only.
Everything else the report needs is derived rather than typed: the floor areas it states (the conditioned floor across every storey, and the thermal envelope floor that enters the heat-loss calculation) are read from the traced or entered envelope, and the version on the report comes from the project's save history.
With a plan attached, ✨ Read with AI can pre-fill the site address, designer and consent reference from the drawing's title block (and the climate zone where the drawings give one, and optionally Notes), for you to check.
New building work, or an alteration or addition
Project Information also carries a Building work switch: New building work (the default) or Alteration or addition. Leave it alone for a new building and nothing about the project changes. Switch it for work on an existing building and each element row gains an Existing fabric choice, so you can say which fabric is new, which is existing and unchanged, and which is existing and altered. See Alterations and additions.
Attach the plan (optional but recommended)
Attach the architectural plan set under Plan PDF (optional). It uploads to your account and stays available to View plan, Download, Replace or Remove. The plan card also offers ✨ AI plan summary - a floating window listing what the drawing set states, with page citations. See Uploading and calibrating your plan.
Save, and track status
Click Save - beside the project name, or at the left end of the report bar at the foot of the page - to persist the project to the Dashboard. New starts a fresh project (it confirms first if you have unsaved changes). Generating a report also saves the project automatically first, so a report always reflects a saved version.
Your work is autosaved as a draft between saves. Unsaved edits are mirrored continuously in your browser, and for a saved project they also back up to your account every half-minute or so: one rolling draft per project, overwritten in place. Drafts never touch your version history, which still records exactly the saves you make. If a tab closes before you save, Thermly offers the work back the next time you open the page (Resume unsaved draft? for a session that was never saved, Resume unsaved changes? for a saved project with newer autosaved edits). A draft is never applied over saved work, or discarded, without you choosing. A brand-new session is also given a project of its own as soon as it becomes substantive - a plan attached, or a first real element row - named after the plan if you have not named it, so uploaded files always belong to a project.
Each project carries a status you control:
| Status | What it means |
|---|---|
| Draft | Editable working state. Reports carry a preview watermark. |
| In Review | Set aside for a final check; still editable, still watermarked. Address review comments, then submit or return to draft. |
| Submitted | Submitted for approval; awaiting sign-off. Locked against edits: withdraw it to Draft to keep editing, or approve it to finalise. Reports print without the watermark. |
| Approved | Final and locked. Reports print without the watermark. Make a copy to revise. |
Make a copy (in the Dashboard card's More menu and the row actions) creates an independent duplicate named "<name> (copy)" and opens it ready to edit. The copy is faithful - envelope, R-values, report details, assemblies, openings, and the attached plan with its take-off diagrams are all duplicated - and it works even on a locked or approved project, which is the intended way to fork a signed-off job to revise it.
Organise with folders
On the Dashboard, group projects into folders. Projects not in a folder sit in your Workspace. Filter and sort the list by zone, name, or date, and switch between Cards and Rows.
Share with your team
If you belong to an organisation, you also get shared folders visible to the whole team. Move a project into a shared folder to collaborate on it. One person edits a shared project at a time: while a colleague has it open for editing, the page names them, and you can still view the project or make your own copy (an organisation admin can also take over). Colleagues can add review comments against each element at any status (a submitted project stays reviewable); the In Review status marks a project as set aside for that final check. Organisation admins can also set a report logo and accent colour under Settings → Organisation so generated reports carry the practice's branding. See Can I share projects with my team?